Saturday, December 31, 2011

Peanut Butter Cookies

INGREDIENTS
1/2 cup sugar
1/2 cup packed brown sugar
1/2 cup butter, room temperature
1/2 cup peanut butter
1 egg
1 1/4 cup flour
3/4 teaspoon baking soda
1/2 teaspoon baking powder
1/4 teaspoon salt


1 Beat the butter until creamy, 2 minutes. Add the sugars, beat for 2 more minutes. Mix in the peanut butter and egg. Mix together the dry ingredients - flour, baking soda, baking powder and salt. Stir the dry ingredients into the sugar butter mixture.

2 Wrap dough in plastic and refrigerate at least 3 hours.

3 Preheat oven to 375°F. Shape dough into 1 1/4 inch balls. Place about 3 inches apart on ungreased cookie sheet. Flatten in crisscross pattern with a fork. Bake until light brown, 9 to 10 minutes. Cool on baking sheets for a minute; transfer to rack to cool completely.
For chewier cookies, bake at 300°F for 15 minutes.

Yield: Makes about 2 dozen cookies.

For Peanut Butter Blossoms

1 Shape dough into 1-inch balls. Roll in granulated sugar; place on ungreased cookie sheet.

2 Bake 8 to 10 minutes or until lightly browned. Immediately press a chocolate into center of each cookie. Cookie will crack around edges.

3 Remove from cookie sheet to wire rack. Cool completely.

Wednesday, December 28, 2011

Pineapple Casserole

2 (20 ounce) cans of pineapple tidbits-drain all juice except for 6 tablespoons)
1 cup sugar
6 tablespoons flour, plain
2 cups cheddar cheese (mild) grated
1 stick of butter, melted
Escort crackers (use two of the cellophane packs inside box) crushed or Ritz

1. Mix sugar, flour and the 6 tablespoons of pineapple juice.

2. Stir in drained pineapple and grated cheese. Pour into casserole dish.

3. Top casserole with buttered cracker crumbs.

Bake at 350 degrees for 30-35 minutes.

Friday, December 23, 2011

Fudge

3/4 c. milk
2 sq. Bakers' unsweetened chocolate
2 c. sugar
3 tbsp. butter
2 tbsp. vanilla

1. Melt chocolate in milk over medium heat. When blended, add sugar and bring to boil. Candy is done when you drop a small amount of fudge in cold water and it forms a hard, brittle ball.

2. Fill sink with 3 inches of water and remove pan from stove and set it in water. Add butter and vanilla and stir until well mixed and thick.

3. Pour into buttered pie tin. Place in refrigerator until cold. May also add nuts if desired.

Yeast Rolls

Ingredients

2 cups hot water
1/2 cup margarine
1/3 cup white sugar
2 teaspoons salt
1/2 cup cold water
2 (.25 ounce) packages active dry yeast
5 1/2 cups all-purpose flour
2 eggs
Directions

Melt margarine in hot water. Add sugar and salt and stir. Add cold water and yeast. Stir to dissolve yeast.

Add 3 cups flour and mix. Add eggs and 2 1/2 - 3 cups more flour. Mix, cover and let rise until dough doubles in size.

Punch down and let rise 30 more minutes or until doubles.

Make walnut size balls of dough. Place about 2 inches apart in well-buttered 9 x 13 inch pan. Bake in a preheated 350 degrees F (175 degrees C) oven for 30-45 minutes. Brush top of rolls with margarine while hot.

Creamy Broccoli Soup

1/4 cup chopped onion
1 tablespoon butter
1 8 ounce package cream cheese, cubed
1 cup milk
1 chicken bouillon cube
3/4 cup boiling water
1 (10 ounce) packaged chopped broccoli, cooked and drained
1/2 teaspoon salt
dash pepper
silvered almonds, toasted

1. Saute onion in butter.

2. Add cream cheese and milk. Stir over low heat until cream cheese is melted.

3. Dissolve bouillon cube in boiling water. Add to cream cheese mixture.

4. Stir in broccoli, lemon juice and seasonings.

5. Heat thoroughly. Top each serving with toasted almonds.

Cheese Cake-Pecan Pie

1 8 ounce package cream cheese, softened
1 large egg
1/3 cup sugar
1/4 teaspoon salt
1 teaspoon vanilla extract
1 unbaked 9 inch deep-dish pastry shell
1 1/4 cups chopped pecans
3 large eggs, lightly beaten
1 cup light corn syrup
1/4 cup sugar
1 teaspoon vanilla extract

1. Combine cream cheese, egg, sugar, salt and 1 teaspoon vanilla extract; beat on low speed with an electric mixer until smooth.

2. Pour into pastry shell; sprinkle evenly with pecans.

3. Combine 3 eggs, corn syrup, sugar and 1 teaspoon vanilla extract. Pour in pie shell.

Bake on the lowest rack at 350 degrees for 35 minutes or until set.

Thursday, December 22, 2011

Baked Macaroni and Cheese

1 pkg. (8 oz.) elbow macaroni
1/2 tsp. salt
2-1/2 tbsp. butter, melted
1-3/4 c. milk
1/3 c. bread crumbs
8 oz. Velveeta, cubed
2 tbsp. flour
1/8 tsp. pepper

Cook macaroni as directed on package and drain. Melt 1-1/2 tbsp. butter in a heavy saucepan. Blend in flour, stir in milk slowly, and cook, stirring constantly, until mixture thickens. Add seasonings and cheese, stirring until cheese is melted. Add macaroni and transfer to a buttered 1 qt. casserole or individual casseroles.

Combine bread crumbs and 1 tbsp. melted butter. Sprinkle over macaroni.

Bake at 400°F for 20 minutes.

Wassail

1 gallon apple cider
1 quart orange juice
4 sticks cinnamon
1 cup lemon juice
1 quart pineapple juice
12 whole cloves
1 cup sugar
water to finish out 1 1/2 gallon

Mix all ingredients and simmer 10 minutes. Remove cinnamon sticks an cloves. Serve hot.

Tuesday, December 20, 2011


INGREDIENTS:
Unsalted butter, softened
One 12-ounce package semisweet chocolate chips
1 cup butterscotch chips
One 14-ounce can sweetened condensed milk (save the can)
1 teaspoon pure vanilla extract
One 8-ounce can walnuts, plus more for topping
½ cup raisins or dried currants (a couple of handfuls)
Candied red and green cherries (optional)

DIRECTIONS:
1. Grease an 8-inch round cake pan with softened butter. Pour the chocolate and butterscotch chips, condensed milk and vanilla into a medium saucepan. Put the pan on the stove and turn the heat to low.

2. Cover the empty condensed-milk can with plastic wrap and put it in the center of the round cake pan.

3. Stir the chips and milk until they melt together, about 3 minutes. Have a GH (Grown-up Helper) move the pan off the stove if it's too heavy. Place the pan on a pot holder so it does not burn the kitchen counter. Stir in the nuts and raisins. Scoop the fudge into the cake pan all around the plastic-covered can in the center to form a wreath or ring shape. Let it be all bumpy and funky on top. Keep pushing the can back to the center if the fudge moves it away from there. Cut the red cherries in half with scissors and the green cherries into quarters. Use the green pieces to make leaves and the red to make holly berries. Decorate the fudge with several groups of holly berry sprigs made from the cherries and garnish with walnuts between the sprigs. (The fudge looks good left plain, too!)

4. Put the fudge in the fridge and chill until firm. Remove the can from the center, then loosen the sides and bottom of the fudge with a spatula. Cut the fudge into thin slices to serve.

Monday, December 19, 2011

Blackberry Cobbler

1 cup self rising flour
1 cup sugar
1 cup milk
1 stick butter
1 quart blackberries

1. Melt butter in a 2 quart baking dish.

2. Mix flour, sugar and milk; beat until well mixed, then pour over melted butter. Do not stir.

3. Cover with t0 sweetened blackberries and stir slightly to mix.

4. Bake in a preheated 350 degree oven about 30 minutes until crust rises to top and is lightly brown.

Recipes, Remedies & Rumors, Cades Cove Preservation Association, McCauley

Friday, December 16, 2011

Dump Peach Cobbler

1 cup self rising flour
1 cup sugar
3/4 cup milk
1 stick margarine
1 large can sliced peaches

Sift four in 2 qt casserole dish, add sugar and milk. Stir until smooth. Melt margarine in saucepan, pour into center of batter. DO NOT STIR.

Pour peaches with juice into center. DO NOT STIR.

Bake at 400 degrees for 45 minutes.

Recipes, Remedies & Rumors,  Cades Cove Preservation Association, Dorthy Sutton

Wednesday, December 14, 2011

Corn Casserole

3 eggs well beaten
1 can cream style corn
1 can whole kernel corn undrained
1 stick butter melted
1 8 ounce French onion chip dip
1 box Jiffy muffin mix

Mix well-bake 350 degrees for 35 minutes.

Recipes, Remedies & Rumors,  Cades Cove Preservation Association, Dorthy Sutton

Friday, December 9, 2011

Cheese Ball

2 8 oz pkg cream cheese (softened)
1 small can crushed pineapple (drained)
1 cup chopped pecans
1/4 chopped green pepper
2 tablespoon chopped onion
Seasoned salt

Mix together and shape into balls or rolls. Roll in chopped pecans and chill until ready to serve.

Pumpkin Butter

4 cups peeled and cubed uncooked pumpkin
1 cup sugar
1 tablespoon lemon juice
1/8 teaspoon ground cloves
1/2 teaspoon ground cinnamon

1. Place the pumpkin in a saucepan and cover with water. Bring to a boil and cook until the pumpkin is quite soft, about 5 to  minutes. Drain well. Puree in a blender, processor or a food mill.

2. Place in a heavy-bottomed saucepan and stir in lemon and sugar. Bring to a boil over medium heat, then reduce heat to simmer and let cook until thick, about 30 to 45 minutes. stirring frequently. Has a tendency to stick to pan.

3. Test by placing a teaspoonful on cool plate. Butter is ready if no liquid appears to separate from the puree. Season with spices and pack into sterilized jars. Store in refrigerator until ready to eat. Eat like butter.

Monday, December 5, 2011

How to Make Dried Apples from Fresh Apples

Step 1 - Selecting the applesApples

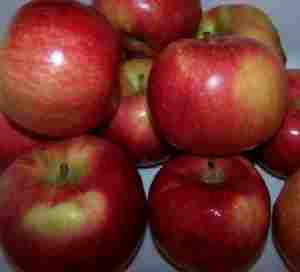
It's fun to go pick your own and you can obviously get better quality apples! But you can also dry apples that you purchase at a grocery store or farm market. 
Also, you don't want mushy, bruised or rotten apples!
Which varieties?  Whatever are your favorites!  I prefer sweet, flavorful apples, like Fuji's, but any will work!

Step 2- Wash the apples

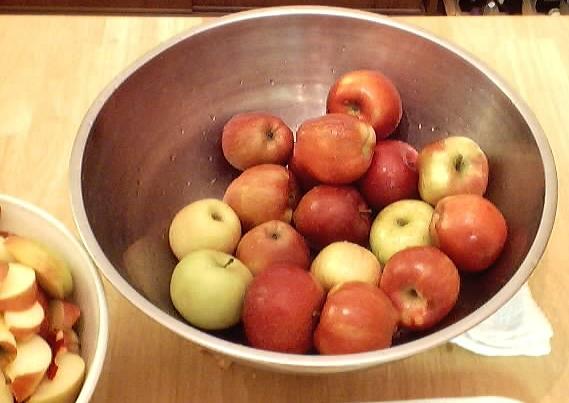
Just wash them in cold water, no soap. If you are going to remove the skins, don't spend too much time on it. Either way, be sure to remove any stickers that the grocery store put on the apples, though.  Peelers often get suck on those.

Step 3 - Removing bruises and soft spots

Cut out any bruised or soft parts.

Step 4 -  (Optional) Removing the apple skins

If you do not want to remove the skins, skip to step 5. This is completely optional; some people prefer them with skins, some without. The type you buy in the stores usually has the skins intact.
The mechanical apple peelers really DO work well - they're fast and easy; as long as the apples are firm and do not have many bruises or soft spots. 
This type of peeler also cores (eliminating the seeds, stem and bottom at the same time) AND slices the apples into a spiral that is about 1/8 inch thick.  I break it into nice rings. This little device really saves a lot of time!

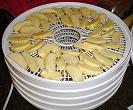
Step 5 - Drying the apples

As I said at the beginning, you have 3 choices:
  • A Food dehydrator - which is the easiest way, and since it is designed for this purpose, yields the most consistent results.
  • An oven - everyone has one of these, so that means you need no additional equipment
  • A car (well, or truck, suv, minivan, etc.) and a very hot , sunny day.
Regardless of the drying method you use, you spread the apple slice out on their trays and you may opt to sprinkle them with cinnamon or other spices!
Here are the specific directions for each method. NOTE: that there is a huge degree of variation in both moisture content and drying rate of different apple varieties, and ovens and driers vary considerably, too. The same variety will behave differently in different seasons. Plus you may like your slices more chewy or crisp than I do; which may require you to shorten or length the drying time. The key is to monitor the first batch closely, check them and sample them occasionally until they are the way you like and use that timing for future batches.
  1. Food dehydrator: Arrange the pieces on each rack so that air can circulate, preferably with a the pieces not touching each other, but there's no need to become obsessive about it. Some people prefer to sprinkle the apples with some spices (typically cinnamon, nutmeg or allspice). Turn the dehydrator on and enjoy the aroma.  If your food drier has a thermostat, set it for 140 degrees F. It will take 12 to 24 hours. See "how to tell when they are done" in step 7, below.
  2. Oven: preheat the oven to 150 degrees F (65 degrees C or gas mark 1).  If you don't have these settings, just use the lowest setting you've got. Arrange the apples on cake racks, spread out, not touching each other. Cookie sheets will work if you don't have cake racks or screens - but your need to flip or stir the apples once in a while to expose the other side of them. Some people prefer to sprinkle the apples with some spices (typically cinnamon, nutmeg or allspice). Close the oven. It takes about 10 to 20 hours, but you'll need to check periodically, including rotating the shelves and moving them up or down to get even heating. If you want to speed it up, you can bump the heat up to as high as 200 degrees F ( 93 degrees C), but you'll need to watch them much more closely. See "how to tell when they are done" in step 7, below.
  3. Automobile and a hot sunny day: It sound strange but the same stifling hot car that burns your legs makes an excellent food dryer.  Spread the apple slices out on shallow trays (they work better than cookie sheets, since you don't need to worry about leaking juice!).  over them loosely with cheesecloth to keep any potential for bugs to come in contact.  Put the trays on the dashboard of your car and roll all the windows up and park in the sunniest spot you've got. It's best to start in the morning and let it go to sunset.  It may take 2 days - bring the apples in the house overnight. Some people prefer to sprinkle the apples with some spices (typically cinnamon, nutmeg or allspice)  but you'll need to check periodically. See "how to tell when they are done" in step 6, below.

Step 6 - How to tell when they're done

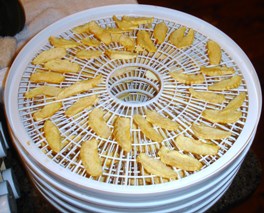
The amount of time it takes depends on the water content of the apples, the thickness of the slices, and how well the air is able to circulate around them. When done, the apples should be flexible, like a raisin from a fresh bag; not brittle. Most describe them as leathery with a deep red color, without free water or a tacky feeling. If you want them drier, more crispy, that's fine, but you need to dry them at least to the consistency of a raisin, or they won't keep!

Step 7 - Cool, then Fill the Zipper-type bags

Let the apples cool to room temperature (about 20 to 30 minutes), then fill the bags. Don't overfill the bags, leave a little room for expansion. Do try to avoid leaving any air pockets!   A vacuum bag is shown at left, but you can use ziploc (or similar) bags, show below.  But be sure to squeeze out the extra air (below left is before, below right is after squeezing out the excess air)

Step 8 - Vacuum seal the bags (if you have a vacuum sealer)

Obviously if you haven't got a vacuum food sealer, just inspect the bags and you may need to open them and reseal them to eliminate any air pockets! TIP:  If you don't own a vacuum food sealer to freeze foods, place food in a Ziploc bags, zip the top shut but leave enough space to insert the tip of a soda straw. When straw is in place, remove air by sucking the air out.  To remove straw, press straw closed where inserted and finish pressing the bag closed as you remove straw.

Step 9 - Store the bags in a cool, dark place

On a cool, dark shelf, the dried apples will retain their color and flavor for about 6 to 9 months. If you want to store them longer than that, just put them in the freezer instead!

Colonial Gingerbread

2 cups flour
1 cup molasses
3/4 butter-softened
1/2 cup sugar
1 egg
1 teaspoon soda
1/2 teaspoon salt
1 teaspoon ginger
1 teaspoon cinnamon

In a large bowl mix all ingredients and beat until mixed well. Pour into a 9x9x2 baking pan and bake 350 degrees for one hour. Cool on wire rack and sprinkle with confectioners sugar if desired.

From "Recipes, Remedies & Rumors", Cades Cove Preservation Association Volume 1

Chocolate Pie

1 cup sugar
4 tbs cocoa
4 tbs flour
2 eggs
2 cups milk
3 tbs butter

Mix cocoa, sugar, flour together. Add two egg yolks.

Gradually add whole milk. Cook until until thick-medium heat. After thick, add butter and vanilla. Pour into pie shell.


From "Recipes, Remedies & Rumors", Cades Cove Preservation Association Volume 1

Forgotten Cookies

2 egg whites, beaten
add 1/2 tsp vanilla
1/2 tsp vinegar
add 1/2 cups chopped nuts
1/2 cup coconut

Drop by teaspoon on well buttered cookie sheet

Heat oven to 350 degrees, turn off oven put cookies in, do not open oven for 10 hours or over night.

Recipe of Nedja Abbott Moore
From "Recipes, Remedies & Rumors", Cades Cove Preservation Association Volume 1

Saturday, December 3, 2011

How to Thicken Stew

If carrots, potatoes, and other vegetables are in the stew, remove a cup or so when they're fully cooked. Mash or puree the fully cooked vegetables in a food processor, and stir the puree into the stew.
Raise the heat and boil the stew uncovered to concentrate the liquid. Make sure the boil is a gentle one, and stir frequently so the bottom of the pan doesn't scorch. Also, don't do a final seasoning until after reducing the liquid, so you don't inadvertently intensify the saltiness.
Make a beurre maniee, a paste that's equal parts flour and softened butter. Start with 1/4 cup of softened butter, work in 1/4 cup of flour, and stir the paste into the stew, 1 tablespoon at a time, waiting a few minutes after each addition, until desired thickness is reached. Make sure to simmer the stew long enough (about 5 minutes) so no floury taste remains.
Mix 1 or 2 tablespoons instant flour (Wondra) with an equal amount of liquid (cold or hot; additional or from the pot), then stir into the stew a tablespoon at a time.


Read More http://www.bonappetit.com/tipstools/tips/2008/04/how_to_thicken_stew#ixzz1fWLL2erD

Apple Cider Stew

1-2 lbs. beef or venison stew meat
8 carrots, sliced thin
6 potatoes, sliced thin
2 apples, chopped
2 tsp. salt
1/2 tsp. thyme
2 tbsp. minced onion
2 c. apple cider

Place carrots, potatoes, and apples in crock pot. Add meat and sprinkle with salt, thyme, and onion. Pour cider over meat and cover. Cook on low heat 10-12 hours. Thicken gravy.